Translate

Showing posts with label gum paste. Show all posts

Friday, 10 May 2013

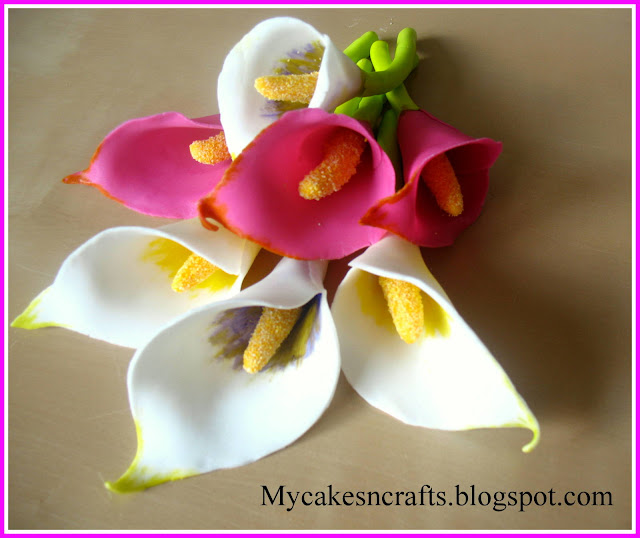
How to make Fondant Gum Paste Calla Lily


These Calla Lily's are very easy to make at a beginner level. They can be made using MMF, Rolled Fondant Sugar Paste or any clay using minimal materials.

Calla Lily


      I made these Calla Lily's  using MMF. They are very easy to make with no any special fondant flower making tools. They hardly need any mastery at work and can be tried at a beginner level. Calla lily's come in varied colours. Try playing with different coloured fondant as a whole or give a try at painting the flowers. You can use fondant, gum paste, sugar paste or clay dough, the tutorial however remains the same. 

Materials :

Heart Cookie cutter or a template shown below
Paper cones
Tooth Picks
Brush
Scissors
Small Knife
Yellow coloured Semolina
Fondant OR Gum Paste ( I used MMF )
Food Colour
Cornstarch to use while rolling the Fondant
Shortening


Method :

Step 1

If you are using a heart cookie cutter you can start with the next step.
But if you want to make large life size Calla Lilies, then you should make a template for the petal of a size as needed.

Fold the paper in half


Staring at the folded edge draw a semi circle and then make a pointed tip at one end of the semi circle. Cut the shape and you get a symmetrical other half when you open the folded paper


Step 2 :

Dust the work surface with cornstarch and roll the fondant thin as a thickness of 2 - 3 sheets of paper.
Place the petal template over the rolled fondant and curve the shape on the rolled fondant.

Tip :
    
     while using the knife to curve the shape dip in shortening so you don't have rough edges of the
      Fondant while curving


Step 3 :
 
Grease hands with shortening and rub the edges with your fingers to remove any roughness due to using the knife. Slowly pinch the edges all around so you have thin edge all over
 Make a paper cone in advance. Place the cone with its tip at the center of the cut petal. so the tip of the petal is towards the round edge of the cone.


Step 4 :

Apply a little of water at the edge as shown below and close them. Apply a very thin coat of water, since fondant is sugar, it will start to melt. So be careful.


Step 5 :

Hold the cone with its tip tucked in between your thumb and index finger. Slowly bend the tip and edges of the petal outward to give a realistic look. If you observe the calla lily, they have a little bend at their edges.


Step 6 :

Lay the cone on its base and let the petal air dry for 10 - 15 Min's. ( the time depends on the thickness of the petal ) Since the fondant dries quickly, and the petal is left to air dry upside down, you have to once again follow the above step .


Step 7 :

To make the Pollens mix semolina and yellow food colour until you get the desired colour


Step 8 :

Grease hands and work surface with Shortening.
To make the Stamens roll a yellow coloured fondant in the shape of a rope, try to make a tapered end. Measure the stamen on the petal template and cut a little more than half of the length as the petal.

( In the picture below I have not yet cut the actual length of the stamen. So don't use such a big length )


Step 9 :
 
Now take a toothpick dip in water and slowly insert inside the stamen by pushing till it reaches the tip of the stamen


Step 10 :

Brush the stamen all over with a little water.


Step 11 :

Roll it in the coloured semolina.


Step 12 :
 
You can skip this step if you do not wish to paint the dried petal.
But if you wish to, then using food colour paint the petal, and allow to dry a while.


Step 13 :
 
Brush a little water to the end of the Stamen and insert the free end of the toothpick into the petal and secure it properly. You may feel the stamen not sticking to the petal at this step. Do not worry. After drying the stamen will be stuck. You can use a Styrofoam base to dry the flowers, by piercing the pointed toothpicks in it.


If you do not wish to make the stems, just snip off the toothpick ends and you are ready to use the Calla Lillies

Step 14 :

To make the stem you could start after the stamens are inserted in the flower.
Take a green coloured fondant ( I used yellow and green colour to colour my fondant for making the stem )

Grease hands and work surface with Shortening.
Roll the fondant in your palm, to make a thick rope.


Step 15 :
 
Cut about 2 - 3 inches and slowly insert the free end of the toothpick, pushing the fondant up to reach the base of the flower.


Step 16 :
 
Brush water to the fondant at the point of contact with the flower, so it is easy to secure.
Slowly move the fondant upwards with your index finger to secure the flower


Allow the flowers to air dry for a while

Fondant White flower Tutorial

Fondant or gum paste flowers,strawberry and leaves as cake toppers for a strawberry shortcake themed birthday cake
Fondant Flowers as cake toppers

    This a very simple flower that can be used to make either big or small in size, and with different colours will give a very elegant look to your cake as a cake topper. such a simple way to enhance your cake.


Tips n Tricks :


Always try to grease your hands with shortening before modelling the flowers.
If you find cracks on the fondant try to knead it a little by greasing your palm with shortening and then keep on rolling it in your palm to form a ball until all the cracks over it have vanished.

If you find the gum paste or the fondant very sticky and soft dust with cornstarch.

Always rub the edgess of the cut pieces with your fingers to remove all the roughed edges.


Materials needed:


Large flower cutter or use a sketch of flower on thick paper
White fondant
Yellow fondant
Rounding tool
Small scissors
Foil
Cup or bowl  to air dry the flowers
Cornstarch for dusting work surface
Crisco

Method :

Step 1

Roll the fondant thin and using a large flower cookie cutter, cut the flower shape. If you dont have one, just draw a flower as big as needed on a card sheet, cut this and use as template guide on the rolled fondant. Now using a small knife cut the shape on the fondant. dont worry if you are not good at drawing, this is a very easy sketch and no petal needs to be unique as in a cooke cutter.


Step 2
Since we need to have petals using a small scissors give small cut at the end of every curve, towards the center of the flower.


Step 3
Slowly rub the edges with your fingers to remove any roughed edge


Step 4
Now dust the work surface with cornstrach and slowly run the ball tool over the petal inside out from the center to thin down the petals. You can see in the picture below how the petal that is being thinned down is larger than the other petals.


Step 5
Now with the ball tool get a small dent at the center of the flower.


Step 6
Use a small ball of yellow fondant and attach it to the center of the flower


Step 7
Since the flowers are large, they need to hold their shape while they air dry. Use a bowl as the size of the flower and place foil inside it to form a holding cup.


Step 8
Now place the flower inside the foil. Let it air dry.


Saturday, 27 April 2013

Spring Colour Mania......

    Spring, Spring, Spring.......
        Spring is in the air.....

      Finally the long wait is over, and now time for some Spring Colours all over.
Daffodils have bloomed, Hyacinths have bloomed, the Cherry Blossoms have opened up and showcasing their glorious beauty.

     But in my sugar garden, I have been working upon some flowers and Calla Lily, Cherry Blossoms, Plumerias, Ranunculus flowers are at their peak. I have earlier worked with Gum Paste to sculpt these flowers, but recently I tried MMF, and from then on have been keen to check how good I can use to sculpt flowers. I found the MMF receipe more easy than the Gum Paste.


Fondant sugar paste gum paste calla lily flower

Calla Lily

 
Fondant gum paste sugar paste modelling clay pleumeria flowers

PLUMERIAS


Fondant gum paste sugar paste modelling clay cherry blossoms cake topper

Cherry Blossoms


        I tried to make the Ranunculus for the first time, with very little guidelines. So, I observed the flower pictures and with what Jacqueline Butler from Petalsweet has blogged, started to sculpt this very simple but tricky flower. I was pretty impressed with the final look of the flower.


Fondant Sugar Paste Gum Paste Modelling Clay Ranunculus flower

Ranunculus


      The pink one was my first attempt. Though not to what I wanted, it does look like a full bloom Ranunculus. ( we need to use at least 3 - 4 different cutter sizes, but I have only 1 size, so I should pat my back for how good it looks )

       The  White Green Ranunculus is my second attempt , and I am fully satisfied how beautiful it looks.
I m glad to see this decked up on a pretty cake very soon.


     With this Ranunculus I have been running crazy for anything grass green in colour.
Finally it is SPRING you see. So Green should be in favour.

      My Green fever has led me in search of a new era of  patisserie. I went on hopping in search of something green coloured mousse based dessert, and found the beautiful, eye catching desserts from Hidemi Sugino that Bertha from Gourmetbaking has created. I have prepared a receipe of homemade Pistachio Paste ( green is dominating now ) and am all set to try my hand at all the delicious, yummy pistachio pastries. I hope I will be successful in making them, the way Bertha has presented.


Thursday, 11 April 2013

Fondant Gum Paste Strawberry Tutorial


An easy strawberry tutorial


       I used MMF fondant for making these Strawberries, but you can use gum paste or any modelling dough.

    Colour your fondant with red food colour, I used the wilton no taste christmas red. It will take a lot of colour for the amount of fondant as the size of your fist. So I suggest the best way is to colour the fondant when you are making the receipe if it is a huge batch needed. Also you will need some green coloured fondant for making the tops of the strawberries.

Materials needed:

Red & Green food colour
Small Star shaped cookie cutter
Tooth pick or any pointed tool
Brush
Cornstarch
Rolling pin

  Step 1
Roll the green fondant and using a star cookie cutter that is smallest about an inch or so, cut a star shape. Smooth the edges wih your fingers and keep aside.


Step 2
Now take the red coloured fondant as much as the size you want the strawberry to look. Roll it in the palm of your hands so that you have a smooth finish with no crack lines on the fondant ball. If the cracks are still visible then grease your hands with crisco or any shortening that you are using and roll the ball with your palm.


Step 3
     Now try to slowly get a tapered end to the ball, retaining one end to still look like a ball


Step 4
Now make small dent inside the rounded edge so we can fix the calyx . You can a use a clean end of a paint brush if you dont have a round edged tool.


Step 5
Take a pointed item like a tooth pick and apply cornstarch to it, now prick holes so you can give the look of the seeds


Step 6
Take a tiny piece of fondant and make a little stem head


Step 7
Brush a little water at the dent hole on the strawberry and fix the star shape and the tiny stem head


wow ! you have your strawberry!